| Announcements |
Syllabus |
Schedule |
Weekly lecture notes |
Assignments |
Links |
How to upload your website to the ASU server and some HTML links
As a little sidenote: We encourage you to look at the source code of this and any other page.
You can use them as an inspiration: If you like a certain feature -just look into the source code and
copy i.e. modify it so it fits your needs. As a personal note -reading source code is generally easier when it
was written by hand and not with a web design program. Also, I highly recommend to indent your html-code well.
It makes it so much easier to read the source code because you recognize the hierarchy of your commands
right away -look at the source code of this site to see what I mean.
As the name already tells you, this webpage was made to help you to get started on the ASU server and gives you
a couple of links to tutorials for HTML programming. The site is actually more of a link parade than anything else.
We will begin with guiding you trough the process of getting access the server i.e. activate your webspace. You
can get all the information on the ASU website and we will direct you to the necessary sites as well as comment
some points along the way.
Activate Personal Webpage at ASU
- Go to http://www.asu.edu/asurite
- Enter your ASURITE id (probably the same username for your ASU email)
- It will probably tell you that you've already activated your ID,
if not just follow the steps
- There should be 5 brown boxes, the middle one says "ASURITE
Account Management Subscribe to additional computing access/services".
Click on it.
- Now it should display some buttons you can activate for different
services. You need to activate the following:
- AFS Fileservice (network file space)
- General Computing UNIX Cluster (general.asu.edu)
- Personal Webpage Hosting
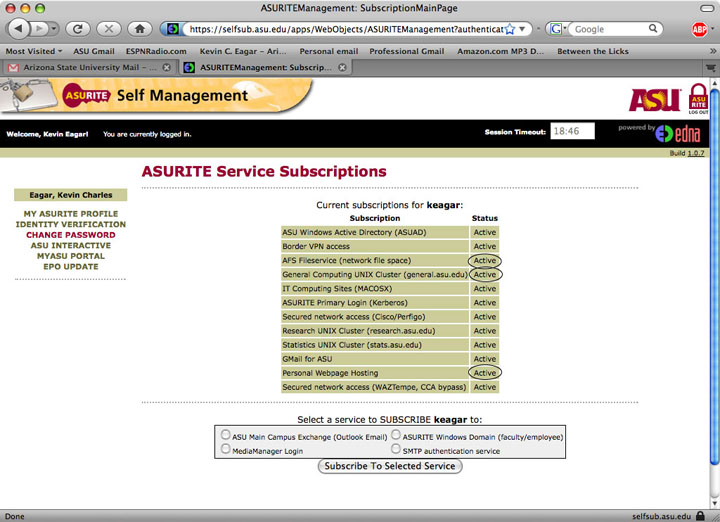
- Once those are selected, click "Subscribe To Selected Service" at
the bottom.
- Then, it shows you a list of what you want to subscribe to. Click
"Subscribe Me Now".
- It will process your request and then bring you back to the
subscription page.
Downloading Secure File Transfer software from ASU so you can get your files onto the webserver
If you are working on computer at ASU you can skip this step. The file transfer program "SSH" should be installed
on your computer. If not or if you use your own personal computer keep on reading. Now you have webspace -which is quite useless if you can't access it. There are different ways to access
a server.
- Windows: You can also use "SSH" a file transfer program that you can -as an ASU student- download
for free. To do that, go to http://myapps.asu.edu. Here, you can download any of
the software and use it as long as you are enrolled at ASU. Search for SSH for Windows, download, and install it!
- Macintosh: Go to http://myapps.asu.edu, Search for "sftp". The first thing that comes up is a package called "Fetch". This is what you want.
Accessing your personal webspace
- From http://my.asu.edu and look under Computing, Phone, and Data services and towards the bottom, you will see AFS Manager - Manage AFS file space.

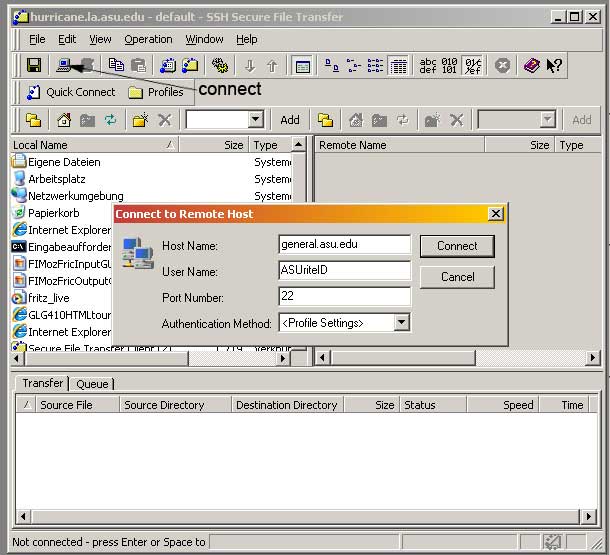
- Windows: Start the SSH Secure shell => Secure File Transfer Client. Here you can click at "connect" or "quick connect"
(see figure below) to do just that. Enter the name of the computer i.e. server that you want to connect to.
Your webspace is located under "general.asu.edu". Login using your ASUriteID and password. On the right side
of the screen is remote computer that you have connected to. There you should see two folders named "Backup"
and "www". Everything you want to put on your website goes into the latter folder.
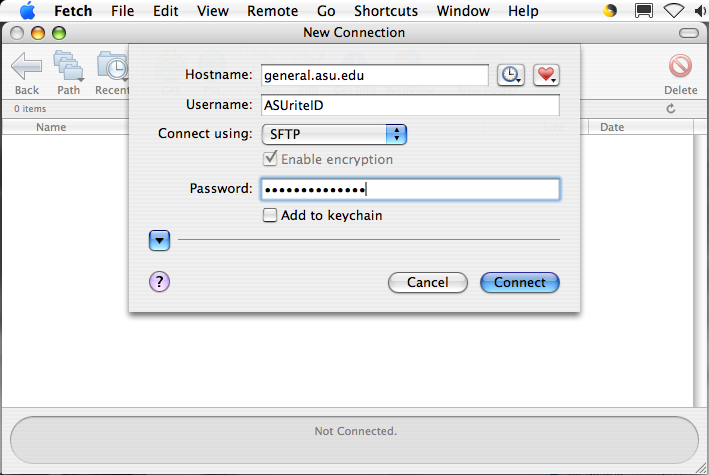
- Macintosh: Start Fetch => Secure File Transfer Client. A "New
Connection" automatically starts. Next to "Hostname:", enter the name
of the computer i.e. server that you want to connect to. Your webspace
is located under "general.asu.edu" so thats what you type. Next to
"Username:", enter Login your ASUriteID. Below that, next to "Connect
using:", select "SFTP". Then enter your password next to "Password:".
At the bottom, click the "Connect" button. You are now looking at
the files on that server. There you should see two folders named
"Backup" and "www". Everything you want to put on your website goes
into the latter folder.
Links to HTML tutorials
So, now that you can upload data (i.e., a website) you should start building one. The nice thing about
writing it by hand is that you only need the most simple word processing program (e.g. the WINDOWS Editor). DO NOT USE Microsoft WORD and for now, do not use an HTML editor!
Here are a number of links that help you writing HTML. I actually looked them up the whole time I was
writing this page...
Page written by Olaf Zielke and modified by Ramón Arrowsmith.
Last update, January 21, 2009